Learn
Elementary Lesson Plans
- The Museum will be closed Sunday, April 9 in observance of Easter.
Description
The Lyme Art Colony was a group of artists who were drawn to Old Lyme, Connecticut, as early as 1900. They stayed at the Griswold boardinghouse that was owned and operated by Florence Griswold. Many would reserve their place at the boardinghouse by writing Miss Florence a letter.
This lesson introduces students to Miss Florence Griswold and the Lyme Art Colony by having them imagine being one of the painters and writing letters to Miss Florence and a packing list of what they will need for their stay at the boardinghouse in 1910. Students use the Museum’s on-line resources to gather information (both in words and pictures) about the daily life of artists at the boardinghouse before writing letters and lists using a historic voice.
Objectives
To learn about Miss Florence and the Lyme Art Colony
To read a historic letter from an artist
To use the Museum’s website as a source of information
To view historic photographs and paintings of people
To adopt a historic persona and imagine what life was like in the early 1900s
To write letters and lists using a historic voice
Curriculum Connections
Social Studies educational experiences in grades K-4 will ensure that students:
Gather historical data from multiple sources
Engage in reading challenging primary and secondary historical source materials, some of which is contradictory and requires questioning of validity
Describe sources of historical information
Write short narratives and statements of historical ideas and create other appropriate presentations from investigations of source materials
Exhibit curiosity and pose questions about the past when presented with artifacts, records or other evidence of the past
Seek historical background when confronted with problems and issues of the past, as well as of today’s world and their own lives
Be active learners at cultural institutions, such as museums and historical exhibitions
Display empathy for people who have lived in the past
Recognize relationships between events and people of the past and present circumstances, concerns, and developments
Visual Art educational experiences in grades K-4 will ensure that students
Differentiate between a variety of media, techniques and processes
Describe how different media, techniques and processes cause different effects and personal responses
Discuss a variety of sources for art content
Select and use subject matter, symbols and ideas to communicate meaning
Language Arts educational experiences in grades K-4 will ensure that students
Will speak, write, or draw in a variety of modes (narrative, “all-about” nonfiction pieces, poetry) to tell stories that their audience understands
Will generate questions for gathering data from appropriate first-hand, visual and print sources, and categorize the data to produce a product
Will compose a piece of writing based on ideas generated through any of a variety of ways (writing, drawing, talking, webbing, listing, brainstorming), revise and proofread it, and present it to an audience
The above goals align with this lesson and were selected from The Connecticut Framework: K-12 Curricular Goals and Standards (adopted in March 1998, published by the Connecticut State Department of Education, Division of Teaching and Learning).
Engaging Prior Knowledge
Inclusion Activity
Begin the lesson with a Student Grouping Activity that places students into unique pairs or trios to discuss a question designed to stimulate their prior knowledge on a subject or idea related to the lesson. Several activities that will help organize students into unexpected groups are listed below. Of course, other methods of pairing up students may be substituted for these activities.
Student Grouping Activities
Musical Pairs
Use a portable CD player or simple instrument to play music/sound. Explain to the students that when the music/sound starts they are to walk around the room silently in a safe but random pattern (nodding friendly hellos to their fellow students). When the music stops, the students should pair up with the nearest person to discuss the question read aloud. After each question is discussed, start the music again. Repeat until all three questions have been discussed.
A Circle of Friends
Ask your students to get into a circle facing the center. Ask every other student to step into the circle facing out. Have the inner circle rotate to the right until they are face to face with a partner. Ask the first question. After the question is discussed, have the outer circle move three or four people to the right to line up with a new partner. After the question is discussed, have both the inner circle and outer circle move three to four people to the right to line up with a final partner.
Enjoying a Little Tete-A-Tete
The term “tete-a-tete” refers to a private conversation between two people (as well as a short sofa intended to accommodate two persons). Ask your students to put their chairs into pairs (side by side, but facing in opposite directions) and take a seat. After each question is discussed, have students move to another seat and partner up with a new person.
Find Two Like You
Ask your students to find two other students who match a certain criterion like: Find two other students with your hair color; or Find two other students with birthdays close to yours; or Find two other students who have same kinds of pets; or Find two other students who like your favorite ice cream flavor. Students usually begin to call out their answers and cluster with those whose answers match. Once they have three people, their group is complete. Teachers may have to make a cluster of non-matching students.
Once the students are in their pairs or trios, have them discuss one of the following questions read aloud by the teacher. After a minute of discussion passes, remix the groups and continue with next question. Repeat until all questions have been discussed.
Discussion Questions
Describe the last card or letter you received.
What is the difference between a house and a hotel?
What makes you comfortable when you are in a strange place?
Instructions
Please share your suggestions for making this lesson better. Let the Museum know how this lesson worked for you and your students by sending your comments and suggestions to david@flogris.org. Educators are encouraged to submit copies of final products and/or digital images to be shared on our website.
1. Begin by reading aloud The Story of Miss Florence and the Lyme Art Colony to introduce students to the Lyme Art Colony.
2. Introduce the assignment of pretending to be an artist in 1910 who wants to stay at Miss Florence’s boardinghouse and make paintings as part of the art colony. For this assignment, they will write a letter to Miss Florence announcing their intentions to stay at her house, make a list of all the things they will need to bring with them to Old Lyme, write a thank you note to Miss Florence outlining what they accomplished during their stay. Tell the students that they can learn more about Miss Florence and the Lyme Art Colony via their computer by going to The Fox Chase section of the Museum’s on-line learning site. They should surf the pages looking for information they will want to include in their letters and lists.
3. Divide the class into working groups of three or four and give each one a copy of the letter from Childe Hassam to Miss Florence. Ask the groups to decipher, read, and discuss the letter. What questions do they have now? What more would they like to know? What did the letter make them think about? Do they have any pictures in their heads after reading the letter? How would they change the letter? Have the groups report out their discussion. Download the Childe Hassam Letter
4. Ask the students to imagine that they are an up-and-coming painter in New York a hundred years ago and they’ve been invited to join the Lyme Art Colony by Childe Hassam. They need to write to Miss Florence and introduce themselves and ask for a room and a studio. They are going at a very busy time and must convince Miss Florence to let them stay. After they finish the letter, they will make a list of everything they will need to pack for a two-week stay in the country (as an artist!). Lastly, after imagining their stay at the boardinghouse, they will write a thank you letter to Miss Florence, reminding her of all the things that went on during their visit.
Have students use a computer to explore The Fox Chase and In Situ: The Painted Panels. They should surf the pages looking for interesting facts and artists’ traits that can be incorporated into their letters and list.
5. Gather the learning groups together after the students have had time to visit the website. Have the groups brainstorm about the kinds of things an artist might say in a letter introducing themselves to Miss Florence and asking her to reserve a room for them. Allow them time to work independently on the draft of their letter. Repeat the group brainstorming and independent writing for a list of what to pack as well as the follow-up thank you note.
6. During the draft stages, have students get together to compare ideas and approaches to their letters and list. Encourage students to make suggestions to enhance each other’s thinking and writing.
7. For the final presentation, encourage students to prepare a creative final draft of their letters and list. Let the students share their final products with their learning group. Ask groups to report out what they learned as a group. Arrange the final projects around the room and let the students explore the other letters and lists individually.
Have students reflect on the following questions in their own journals.
A Time for Reflection
Content/Thinking
Why did the artists write letters to Miss Florence?
What determined what the artists would pack for their stay?
Social
How did your group help you to write a better letter?
What were your best suggestions for the group?
Personal
What else could you include in your letter to Miss Florence that would tell her a little bit more about who you are?
What do you think you would have liked best if you stayed at the Miss Florence’s boardinghouse?
Appreciations
Before concluding the lesson, be sure to invite appreciations from the group (i.e. thank group partners for good brainstorming or suggestions for better writing). To help students begin making statements of appreciation, use such sentence starters as these:
I liked it when … (describe the situation)
I was amazed when . . .
Follow-Up Activity
Consider planning a field trip to the Museum in Old Lyme with your students. Information about a visit can be found on Plan Your Visit.
Wiggles & Giggles
A Creative Pastime Played by the Artists of the Lyme Art Colony
Download this Lesson as a PDFDescription
The Lyme Art Colony was a group of artists who were drawn to Old Lyme, Connecticut, as early as 1900. They stayed at the Griswold boardinghouse that was owned and operated by Florence Griswold. After a busy day of painting outdoors, or en plein air, they would relax in the Griswold parlor making music and playing games. One of their favorite pastimes was to play a drawing game called the wiggle game.
This lesson introduces students to the Lyme Art Colony by having them organize a small exhibition of wiggle drawings. The lesson involves the students playing the wiggle game and using the Museum’s on-line resources to view historic examples of the game. Students also use the Museum’s on-line resources to gather information (both in words and pictures) about the daily life of artists at the boardinghouse before writing a label explaining one specific wiggle drawing.
Objectives
To learn about the Lyme Art Colony
To use the Museum’s website as a source of information
To view historic photographs and paintings of people
To write a label about a work of art
To learn the history and instructions of the wiggle game that was played by the artists who were part of the Lyme Art Colony
To experience playing the wiggle game
To create a drawing collaboratively
To think about indoor entertainment before the age of television
Curriculum Connections
Social Studies educational experiences in grades K-4 will ensure that students:
Gather historical data from multiple sources
Engage in reading challenging primary and secondary historical source materials, some of which is contradictory and requires questioning of validity
Describe sources of historical information
Write short narratives and statements of historical ideas and create other appropriate presentations from investigations of source materials
Exhibit curiosity and pose questions about the past when presented with artifacts, records or other evidence of the past
Seek historical background when confronted with problems and issues of the past, as well as of today’s world and their own lives
Be active learners at cultural institutions, such as museums and historical exhibitions
Display empathy for people who have lived in the past
Recognize relationships between events and people of the past and present circumstances, concerns, and developments
Visual Art educational experiences in grades K-4 will ensure that students:
Identify various purposes for creating works of art
Describe visual characteristics of works of art using visual art terminology
Recognize that there are different responses to specific works of art
Describe their personal responses to specific works of art using visual art terminology
Identify possible improvements in the process of creating their own work
Demonstrate understanding of how the visual arts are used in the world around us
Language Arts educational experiences in grades K-4 will ensure that students:
Will speak, write, or draw in a variety of modes (narrative, “all-about” nonfiction pieces, poetry) to tell stories that their audience understands
Will generate questions for gathering data from appropriate first-hand, visual and print sources, and categorize the data to produce a product
Will compose a piece of writing based on ideas generated through any of a variety of ways (writing, drawing, talking, webbing, listing, brainstorming), revise and proofread it, and present it to an audience
The above goals align with this lesson and were selected from The Connecticut Framework: K-12 Curricular Goals and Standards (adopted in March 1998, published by the Connecticut State Department of Education, Division of Teaching and Learning).
Inclusion Activity (Engaging Prior Knowledge)
Begin the lesson with a Student Grouping Activity that places students into unique pairs or trios to discuss a question designed to stimulate their prior knowledge on a subject or idea related to the lesson. Several activities that will help organize students into unexpected groups are listed below. Of course, other methods of pairing up students may be substituted for these activities.
Student Grouping Activities
Musical Pairs
Use a portable CD player or simple instrument to play music/sound. Explain to the students that when the music/sound starts they are to walk around the room silently in a safe but random pattern (nodding friendly hellos to their fellow students). When the music stops, the students should pair up with the nearest person to discuss the question read aloud. After each question is discussed, start the music again. Repeat until all three questions have been discussed.
A Circle of Friends
Ask your students to get into a circle facing the center. Ask every other student to step into the circle facing out. Have the inner circle rotate to the right until they are face to face with a partner. Ask the first question. After the question is discussed, have the outer circle move three or four people to the right to line up with a new partner. After the question is discussed, have both the inner circle and outer circle move three to four people to the right to line up with a final partner.
Enjoying a Little Tete-A-Tete
The term “tete-a-tete” refers to a private conversation between two people (as well as a short sofa intended to accommodate two persons). Ask your students to put their chairs into pairs (side by side, but facing in opposite directions) and take a seat. After each question is discussed, have students move to another seat and partner up with a new person.
Find Two Like You
Ask your students to find two other students who match a certain criterion like: Find two other students with your hair color; or Find two other students with birthdays close to yours;or Find two other students who have same kinds of pets; or Find two other students who like your favorite ice cream flavor. Students usually begin to call out their answers and cluster with those whose answers match. Once they have three people, their group is complete. Teachers may have to make a cluster of non-matching students.
Once the students are in their pairs or trios, have them discuss one of the following questions read aloud by the teacher. After a minute of discussion passes, remix the groups and continue with next question. Repeat until all questions have been discussed.
Discussion Questions
What is your favorite indoor rainy day activity or game?
What is the difference between a drawing and a cartoon?
What did people do for fun before television was invented?
Instructions
Please share your suggestions for making the lesson better. Let the Museum know how this lesson worked for you and your students by sending your comments and suggestions to david@flogris.org. Educators are encouraged to submit copies of final products and/or digital images to be shared on our website.
1. Begin by reading aloud The Story of Miss Florence and the Lyme Art Colony to introduce students to the Lyme Art Colony.
2. Introduce the assignment of putting together a small classroom exhibit of wiggle drawings with explanatory labels. To get ready for the exhibition, the students will play the game themselves and use the Museum’s website to learn more about the game and see many examples of historic wiggle drawings in the collection. Tell the students that they can learn more about the Lyme Art Colony and the wiggle game via their computer by going to The Fox Chase section of the Museum’s on-line learning site. They will surf the pages looking for information they will want to include in their wiggle drawing label.
3. Divide the class into even working groups of two or four and give each one a small stack of blank paper, colored pencils, and regular pencils. Describe how the wiggle game is played: working in teams of two, each person should draw three random lines (or wiggles) using colored pencil on the paper, and trade with their partner. The object of the game is for the recipient of the wiggles to connect them into a finished drawing.
When all group members are done with their first wiggle drawing they should share it with the group. Ask the groups to discuss the process and finished drawings. What questions do they have now? What more would they like to know? Were some wiggles more difficult than others to make into a drawing? What did the drawings make them think about? How would they change the wiggles they make next time? Have the groups report out their discussion. Allow your students time to do one or two more additional rounds of drawings with different group members.
4. Have the students select one of the wiggle drawings from the portfolios on the website to be included in the classroom exhibition. Each student should write a label about why they chose the drawing and include interesting facts from the website. Labels should be about 100 words each. To view the wiggle drawings students should go to Resources for Educators. TheWiggle Drawings portfolios are located in the Educators’ Toolbox section. The wiggle drawings can be easily printed out for classroom display. Have students use a computer to exploreThe Fox Chase and In Situ: The Painted Panels to discover information about the Lyme Art Colony, the wiggle game, and their particular artist (please note that not all wiggle drawing artists are represented on the website). They should surf the pages looking for interesting facts that can be incorporated into their wiggle drawing label. Where to start on The Fox Chase to find information: School of Lyme
5. Gather the learning groups together after the students have printed out their wiggle drawing. Have the groups brainstorm about the kinds of things they might write about each drawing. Allow them time to work independently on their wiggle drawing label and return to the website to gather more information.
During the draft stages, have students get together to compare ideas and approaches to their wiggle labels. Encourage students to make suggestions to enhance each other’s thinking and writing.
6. For the final presentation, encourage students to prepare a final copy of their label and perhaps frame the wiggle drawing with construction paper. Let the students share their final products with their learning group. Designate certain students as curators to arrange the wiggle drawings around the room. Hold an opening and invite other students in to see the finished exhibition.
Have students reflect on the following questions in their own journals
A Time for Reflection
Content/Thinking
Why did the artists play the wiggle game?
What would make one wiggle drawing better than another?
Social
How did you decide what to draw?
How did your partners react to the wiggles you gave them?
Personal
What title would you give your favorite wiggle drawing? Explain why you chose that title?
What does the wiggle drawing you picked for the exhibition say about you?
Appreciations
Before concluding the lesson, be sure to invite appreciations from the group (i.e. thank group partners for good brainstorming or suggestions for better writing). To help students begin making statements of appreciation, use such sentence starters as these:
I liked it when … (describe the situation)
I was amazed when . . .
It was fun when we . . .
Follow-Up Activity
Consider planning a field trip to the Museum in Old Lyme with your students. Information about a visit can be found on Plan Your Visit.
Description
The Lyme Art Colony was a group of artists who were drawn to Old Lyme, Connecticut, as early as 1900. They stayed at the Griswold boardinghouse that was owned and operated by Florence Griswold. During that first summer, one of the artists painted a scene on the door leading to his bedroom. The idea of painting on doors was common in the European country inns and hotels frequented by artists. Soon, this became a tradition as other artists painted on Miss Florence’s doors too. When they ran out of doors, one painter suggested that the artists paint on panels to be hung on the walls of the dining room. Today, seeing the many painted doors and panels is the highlight of a visit to the Griswold House.
This lesson introduces students to the Lyme Art Colony by having them write a haiku poem about one of the painted panels. The lesson involves the students viewing the painted panels on the Museum’s on-line site In Situ: The Painted Panels before creating their haiku. Students can use the Museum’s on-line resources to gather information (both in words and pictures) about the Lyme Art Colony and the tradition of painting on the doors and panels.
Objectives
To learn about the painted panels created by the Lyme Art Colony
To use the Museum’s website as a source of information
To use the Museum’s In Situ site to view the historic painted panels
To view historic photographs and paintings of people
To learn about the elements of haiku poetry
To write a haiku about a work of art
To read haikus about a work of art written by other students
Curriculum Connections
Social Studies educational experiences in grades K-4 will ensure that students
Gather historical data from multiple sources
Write short narratives and statements of historical ideas and create other appropriate presentations from investigations of source materials
Exhibit curiosity and pose questions about the past when presented with artifacts, records or other evidence of the past
Seek historical background when confronted with problems and issues of the past, as well as of today’s world and their own lives
Be active learners at cultural institutions, such as museums and historical exhibitions
Display empathy for people who have lived in the past
Recognize relationships between events and people of the past and present circumstances, concerns, and developments
Visual Art educational experiences in Grades K-4 will ensure that students
Identify various purposes for creating works of art
Describe visual characteristics of works of art using visual art terminology
Recognize that there are different responses to specific works of art
Describe their personal responses to specific works of art using visual art terminology
Recognize that the visual arts have a history and a variety of cultural purposes and meanings
Identify specific works of art as belonging to particular styles, cultures, times and places
Demonstrate understanding of how the visual arts are used in the world around us
Language Arts educational experiences in Grades K-4 will ensure that students
Will speak, write, or draw in a variety of modes (narrative, “all-about” nonfiction pieces, poetry) to tell stories that their audience understands
Will generate questions for gathering data from appropriate first-hand, visual and print sources, and categorize the data to produce a product
Will compose a piece of writing based on ideas generated through any of a variety of ways (writing, drawing, talking, webbing, listing, brainstorming), revise and proofread it, and present it to an audience
The above goals align with this lesson and were selected from The Connecticut Framework: K-12 Curricular Goals and Standards (adopted in March 1998, published by the Connecticut State Department of Education, Division of Teaching and Learning).
Inclusion Activity (Engaging Prior Knowledge)
Begin the lesson with a Student Grouping Activity that places students into unique pairs or trios to discuss a question designed to stimulate their prior knowledge on a subject or idea related to the lesson. Several activities that will help organize students into unexpected groups are listed below. Of course, other methods of pairing up students may be substituted for these activities.
Student Grouping Activities
Musical Pairs
Use a portable CD player or simple instrument to play music/sound. Explain to the students that when the music/sound starts they are to walk around the room silently in a safe but random pattern (nodding friendly hellos to their fellow students). When the music stops, the students should pair up with the nearest person to discuss the question read aloud. After each question is discussed, start the music again. Repeat until all three questions have been discussed.
A Circle of Friends
Ask your students to get into a circle facing the center. Ask every other student to step into the circle facing out. Have the inner circle rotate to the right until they are face to face with a partner. Ask the first question. After the question is discussed, have the outer circle move three or four people to the right to line up with a new partner. After the question is discussed, have both the inner circle and outer circle move three to four people to the right to line up with a final partner.
Enjoying a Little Tete-A-Tete
The term “tete-a-tete” refers to a private conversation between two people (as well as a short sofa intended to accommodate two persons). Ask your students to put their chairs into pairs (side by side, but facing in opposite directions) and take a seat. After each question is discussed, have students move to another seat and partner up with a new person.
Find Two Like You
Ask your students to find two other students who match a certain criterion like: Find two other students with your hair color; or Find two other students with birthdays close to yours; or Find two other students who have same kinds of pets; or Find two other students who like your favorite ice cream flavor. Students usually begin to call out their answers and cluster with those whose answers match. Once they have three people, their group is complete. Teachers may have to make a cluster of non-matching students.
Once the students are in their pairs or trios, have them discuss one of the following questions read aloud by the teacher. After a minute of discussion passes, remix the groups and continue with next question. Repeat until all questions have been discussed.
Discussion Questions
What does your favorite season of the year smell like?
What is the difference between a painting and a poem?
What one-word would you use to describe your smile? Can you explain why?
Instructions
Please share your suggestions for making this lesson better. Let the Museum know how this lesson worked for you and your students by sending your comments and suggestions to david@flogris.org. Educators are encouraged to submit copies of final products and/or digital images to be shared on our website.
1. Begin by reading aloud The Story of Miss Florence and the Lyme Art Colony to introduce students to the Lyme Art Colony.
2. Introduce the assignment of writing a haiku about one of the painted doors or panels in the Griswold boardinghouse. Explain that a haiku is a Japanese poem made up of three lines of 17 syllables (5-7-5) and often makes reference to the beauty or mystery of the seasons or weather. Because the poems are so short, each word has to be carefully chosen. [Note to teacher: there are many resources for teaching haiku on the web.
Go to:
www.worddance.com
or
www.kidzone.ws/poetry/haiku.htm
Tell the students that they can learn more about the Lyme Art Colony and the painted doors and panels via their computer by going to The Fox Chase and In Situ: The Painted Panels section of the Museum’s on-line learning site.
3. Divide the class into even working groups of three or four and give each one blank paper and regular pencils. Give each group an inspiration theme and have them brainstorm as many words that relate to the theme as possible. Inspiration themes should be full of images such as: a child’s birthday party, an evening of fireworks, going sledding, the first day of school, a day at the beach, or a late-night thunderstorm. Have each group write out their words on the paper. When the brainstorming is over, remind the groups about the components of a traditional Japanese haiku and ask each student to create their own poem about the theme using the brainstorming words. When all group members are done with their first haiku they should share it with the group. What questions do they have now? What more would they like to know? Were some haikus better at capturing the emotions of the themes? What did the haikus make them think about? How would they change their own haiku? Have the groups report out their discussion.
4. Have the students select one of the painted doors or painted panels from the In Situ: The Painted Panels section of the website. There are 54 separate panels to choose from (some of these are one half of a double-panel scene). They should also surf the pages looking for interesting facts about the Lyme Art Colony and the tradition of painted doors and panels for words and ideas that might become part of their haiku. Where to start on The Fox Chase to find information: The Painted Panels from The Griswold House
5. Suggest that the students begin by describing their panel in various ways (by subject matter, by weather, by time of day, by choice of colors, by overall mood, by biography of the artist, etc.) and make a word list for each. This list will be helpful when producing their final haiku. Gather the learning groups together after the students have chosen their panels. Have the groups brainstorm about the kinds of things they might address in their panels.
6. Each student should write a haiku about their panel. Explain that their haiku should encourage the reader to see the content of the painting in a new way. Remind students that haiku often focuses on natural elements and stresses weather and mood. Allow them time to work independently on their haiku and return to the website to gather more information.
7. During the draft stages, have students get together to compare ideas and approaches to their haiku. Encourage students to make suggestions to enhance each other’s thinking and writing.
8. For the final presentation, encourage students to prepare a final copy of their haiku. Let the students share their final products with their learning group. Compile the collection of haikus in a format that can be enjoyed while on the computer looking at the painted panels.
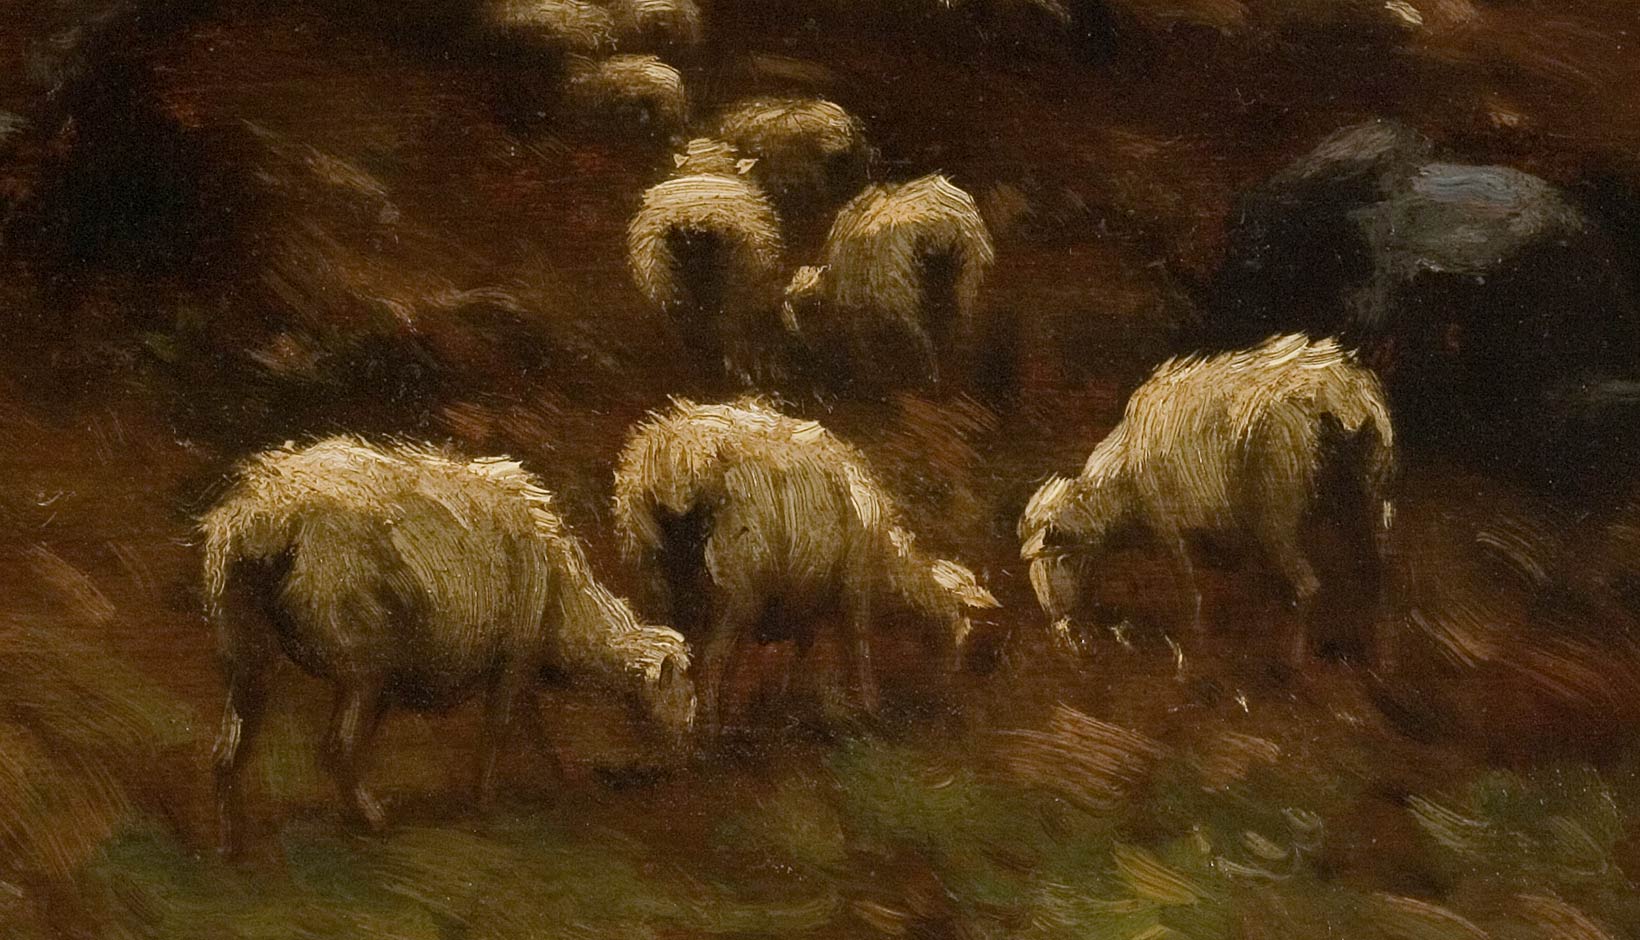
Sample Haiku
Sheepishly the flock
amble up the twilight hill
home to sleep, to dream
Have students reflect on the following questions in their own journals
A Time for Reflection
Content/Thinking
Do you think the artist would see their panel in your haiku?
What did you not include in your haiku?
Social
How did your working group react to your haiku?
How did your partners help you with your haiku?
Personal
What was your favorite word in your haiku and why?
What does the painted panel you picked say about you?
Appreciations
Before concluding the lesson, be sure to invite appreciations from the group (i.e. thank group partners for good brainstorming or suggestions for better writing). To help students begin making statements of appreciation, use such sentence starters as these:
I liked it when … (describe the situation)
I was amazed when . . .
It was fun when we . . .
Follow-Up Activity
Consider planning a field trip to the Museum in Old Lyme with your students. Information about a visit can be found on Plan Your Visit.